လြယ္လြယ္ေလးပါဗ်ာ… Adobe Photoshop ထဲအရင္ဝင္ေပါ့… က်ေတာ္ ေျပာတာ မွားမ်ားသြားလား… Photoshop ထဲလည္း ေရာက္ေရာ က်န္တဲ့ software ေတြနဲ႔ မတူတာက အလုပ္လုပ္မယ့္ ေနရာ မေတြ႕တာပဲ… Photoshop ဘာနဲ႔ အလားသဏၭာန္တူလဲဆုိေတာ့ ပန္ခ်ီဆြဲတဲ့အခါ က်ေတာ္တုိ႔ ဆြဲမယ့္ canvas အရြယ္အစားအတုိင္း ေဘာင္အရင္ က်ပ္ထားရတဲ့ ပုံစံနဲ႔ တူတယ္ဗ်… ကဲ… က်ေတာ္တုိ႔ canvas အရြယ္အစားယူၾကရေအာင္… ဘယ္ကေန ယူမလဲ ဆုိေတာ့ File menu ထဲက New ကို ေရြးေပးပါ…
ေအာက္မွာ ျပထားတဲ့ ပုံအတိုင္း New dialog box ေပၚလာပါလိမ့္မယ္…
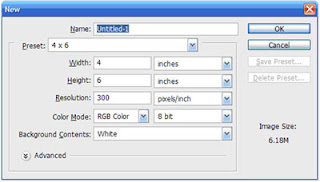 Name ဆုိတဲ့ေနရာမွာ က်ေတာ္တုိ႔ ေပးခ်င္တဲ့ file name ကို ႀကိဳတင္ ေပးထားလုိ႔ရပါတယ္…
Preset ဆုိတာကေတာ့ အသင့္လုပ္ထားေပးတဲ့ အရြယ္အစားနဲ႔ resolution ေတြ အဆင္သင့္ပါရွိတယ္… Preset ေတြနဲ႔ က်ေတာ္တုိ႔ လုပ္မယ့္ အရြယ္အစား မကုိက္ညီဘူး ဆုိရင္ေတာ့…
Width မွာ က်ေတာ္တုိ႔ ဒီဇုိင္းလုပ္မယ့္ canvas size ရဲ႕ ဘယ္ညာ အက်ယ္ကို ႐ုိက္ထည့္ေပးပါ… အဲ.. ေမ့ေတာ့မလုိ႔ ေနာက္က Unit ကို အရင္ေျပာင္းၿပီးမွ ႐ုိက္ထည့္ပါ… inches လား၊ cm လား၊ pixels လား ဆုိတာ အရင္ေရြးခုိင္းတာပါ… press လုပ္မယ့္ပုံေတြ (စကၠဴတုိ႔ vinyl တုိ႔လုိ ျပင္ပ media တစ္ခုခုမွာ ပုံႏွိပ္မယ့္ ဒီဇုိင္းမ်ဳိးေတြ) ဆုိရင္ေတာ့ inches, cm, mm တုိ႔နဲ႔ တုိင္းတာၾကပါမယ္… pixels ကေတာ့ Monitor, TV တုိ႔လုိမ်ဳိးေပၚမွာ တုိင္းတာဖုိ႔အတြက္ သုံးတာပါ… ဥပမာ- web site အတြက္ သုံးမယ့္ ပုံေတြဆုိရင္ေတာ့ pixel unit နဲ႔ တုိင္းတာပါတယ္…
Height မွာေတာ့ လုိခ်င္တဲ့ အထက္ေအာက္ အျမင့္ကို ႐ိုက္ထည့္ေပးပါ…
Resolution – TV, Monitor ေပၚမွာပဲ ေဖာ္ျပမယ့္ ပုံေတြ အတြက္ကေတာ့ 72 pixels/inch ထားရင္ရပါၿပီ… ပုံႏွိပ္စက္ သုံးၿပီ ပုံႏွိပ္မယ္၊ ကာလာပရင္တာနဲ႔ ထုတ္မယ္ ဆုိရင္ေတာ့ 300 pixels/inch ရွိရပါမယ္… outdoor vinyl printing လုပ္မယ္ဆုိရင္ေတာ့ 72 pixels/inch ႐ွိရပါမယ္… billboard လုိမ်ဳိး ပုံအရြယ္အစား အရမ္းႀကီးလုိ႔ က်ေတာ္တုိ႔ ကြန္ပ်ဴတာက မႏုိင္ဘူးဆုိရင္ 30 pixels/inch ေလာက္အထိ ေလ်ာ့ခ် လုိ႔ရပါတယ္… က်ေတာ့္ အေတြ႕အႀကံဳအရ ေျပာတာပါ…
Color Mode - က်ေတာ္ကေတာ့ RGB (Red, Green, Blue) နဲ႔ CMYK (Cyan, Magenta, Yellow, blacK) color mode ၂-မ်ဳိးတည္းပဲသုံးပါတယ္… RGB ကုိေတာ့ Monitor & TV ေပၚမွာပဲ ေဖာ္ျပတဲ့ ဒီဇုိင္းေတြမွာ သုံးၿပီး CMYK ကိုေတာ့ အရာ၀တၱဳတစ္ခုခုေပၚ ပုံႏွိပ္ (Press) ေဖာ္ျပမယ့္ ဒီဇုိင္း လုပ္တဲ့အခါ သုံးပါတယ္… ဒါေပမယ့္ ခၽြင္းခ်က္ တစ္ခုက ဓာတ္ပုံကူးတဲ့ စက္ေတြနဲ႔ ထုတ္မယ္ဆုိရင္ေတာ့ RGB နဲ႔ ဒီဇုိင္းလုပ္ေပးရပါတယ္… ေမာ္နီတာေပၚမွာ RGB နဲ႔ဒီဇုိင္းလုပ္ရင္ အေရာင္ေတြက စုိေျပေတာက္ပၿပီး ၾကည့္လုိ႔ ေကာင္းေပမယ့္ colour printer နဲ႔ထုတ္ရင္ (သုိ႔) ပုံႏွိပ္စက္နဲ႔ ႐ိုက္ႏွိပ္တဲ့အခါ အလြန္ မြဲေျခာက္တဲ့ အေရာင္၊ အလြန္မိႈင္းတဲ့ အေရာင္ေတြ ျဖစ္တတ္တဲ့အတြက္ ပုံႏွိပ္တဲ့ ေနေရာမွာ သုံးမယ့္ ဒီဇုိင္းလုပ္မယ္ဆုိရင္ေတာ့ လုပ္ကတည္းကိုက CMYK နဲ႔ လုပ္တာ အေကာင္းဆုံးပါပဲ…
Background Contents ကေတာ့ canvas စရဲ႕ အေရာင္ပါ… အျဖဴေရာင္ ၊ Background color ၊ Transparent ထဲက တစ္ခုခု ေရြးလုိ႔ရပါတယ္… Background color ဆုိတာက toolbox မွာ ေရြးထားတဲ့ background အေရာင္ကို ေျပာတာပါ… ေအာက္က ပုံမွာ ေရွ႕က အျဖဴေရာင္က foreground color ျဖစ္ၿပီး ေနာက္က အနီေရာင္က background color ျဖစ္ပါတယ္… ခုဒီအေျခအေနအတုိင္းမွာ Background color ကို ေရြးလုိက္ရင္ က်ေတာ္တုိ႔ အနီေရာင္ပိတ္စနဲ႔ လုပ္ထားတဲ့ canvas ကိုရမွာ ျဖစ္ပါတယ္…
ဒါေတြ လုပ္ၿပီးရင္ေတာ့ OK button ကို click လုပ္လုိက္ပါ…
က်ေတာ္တုိ႔အတြက္ ေဘာင္ၾကပ္ထားတဲ့ canvas ရၿပီမုိ႔ ဒီဇုိင္း စလုပ္လုိ႔ရပါၿပီ…
စိတ္ပါတဲ့ အခ်ိန္က်ရင္ ဆက္လက္ခ်ီတက္ပါ့မယ္…
ခုေရးထားတာေလးက NativeMyanmar က ထုတ္ေဝတဲ့ ဇာတိႏြယ္ ဂ်ာနယ္မွာ ပါၿပီးသားပါ...
ဤေဆာင္းပါးပါ အခ်က္အလက္မ်ားကို စီးပြားေရးဆန္တဲ့ လုပ္ငန္းမ်ားမွာ ျပန္လည္ အသုံးျပဳမည္ဆုိပါက ႀကိဳတင္ ခြင့္ေတာင္းၾကပါရန္ ေမတၱာရပ္ခံအပ္ပါသည္။
My Labels: Photoshop, Tutorial,
ေအာက္မွာ ျပထားတဲ့ ပုံအတိုင္း New dialog box ေပၚလာပါလိမ့္မယ္…
 Name ဆုိတဲ့ေနရာမွာ က်ေတာ္တုိ႔ ေပးခ်င္တဲ့ file name ကို ႀကိဳတင္ ေပးထားလုိ႔ရပါတယ္…
Preset ဆုိတာကေတာ့ အသင့္လုပ္ထားေပးတဲ့ အရြယ္အစားနဲ႔ resolution ေတြ အဆင္သင့္ပါရွိတယ္… Preset ေတြနဲ႔ က်ေတာ္တုိ႔ လုပ္မယ့္ အရြယ္အစား မကုိက္ညီဘူး ဆုိရင္ေတာ့…
Width မွာ က်ေတာ္တုိ႔ ဒီဇုိင္းလုပ္မယ့္ canvas size ရဲ႕ ဘယ္ညာ အက်ယ္ကို ႐ုိက္ထည့္ေပးပါ… အဲ.. ေမ့ေတာ့မလုိ႔ ေနာက္က Unit ကို အရင္ေျပာင္းၿပီးမွ ႐ုိက္ထည့္ပါ… inches လား၊ cm လား၊ pixels လား ဆုိတာ အရင္ေရြးခုိင္းတာပါ… press လုပ္မယ့္ပုံေတြ (စကၠဴတုိ႔ vinyl တုိ႔လုိ ျပင္ပ media တစ္ခုခုမွာ ပုံႏွိပ္မယ့္ ဒီဇုိင္းမ်ဳိးေတြ) ဆုိရင္ေတာ့ inches, cm, mm တုိ႔နဲ႔ တုိင္းတာၾကပါမယ္… pixels ကေတာ့ Monitor, TV တုိ႔လုိမ်ဳိးေပၚမွာ တုိင္းတာဖုိ႔အတြက္ သုံးတာပါ… ဥပမာ- web site အတြက္ သုံးမယ့္ ပုံေတြဆုိရင္ေတာ့ pixel unit နဲ႔ တုိင္းတာပါတယ္…
Height မွာေတာ့ လုိခ်င္တဲ့ အထက္ေအာက္ အျမင့္ကို ႐ိုက္ထည့္ေပးပါ…
Resolution – TV, Monitor ေပၚမွာပဲ ေဖာ္ျပမယ့္ ပုံေတြ အတြက္ကေတာ့ 72 pixels/inch ထားရင္ရပါၿပီ… ပုံႏွိပ္စက္ သုံးၿပီ ပုံႏွိပ္မယ္၊ ကာလာပရင္တာနဲ႔ ထုတ္မယ္ ဆုိရင္ေတာ့ 300 pixels/inch ရွိရပါမယ္… outdoor vinyl printing လုပ္မယ္ဆုိရင္ေတာ့ 72 pixels/inch ႐ွိရပါမယ္… billboard လုိမ်ဳိး ပုံအရြယ္အစား အရမ္းႀကီးလုိ႔ က်ေတာ္တုိ႔ ကြန္ပ်ဴတာက မႏုိင္ဘူးဆုိရင္ 30 pixels/inch ေလာက္အထိ ေလ်ာ့ခ် လုိ႔ရပါတယ္… က်ေတာ့္ အေတြ႕အႀကံဳအရ ေျပာတာပါ…
Color Mode - က်ေတာ္ကေတာ့ RGB (Red, Green, Blue) နဲ႔ CMYK (Cyan, Magenta, Yellow, blacK) color mode ၂-မ်ဳိးတည္းပဲသုံးပါတယ္… RGB ကုိေတာ့ Monitor & TV ေပၚမွာပဲ ေဖာ္ျပတဲ့ ဒီဇုိင္းေတြမွာ သုံးၿပီး CMYK ကိုေတာ့ အရာ၀တၱဳတစ္ခုခုေပၚ ပုံႏွိပ္ (Press) ေဖာ္ျပမယ့္ ဒီဇုိင္း လုပ္တဲ့အခါ သုံးပါတယ္… ဒါေပမယ့္ ခၽြင္းခ်က္ တစ္ခုက ဓာတ္ပုံကူးတဲ့ စက္ေတြနဲ႔ ထုတ္မယ္ဆုိရင္ေတာ့ RGB နဲ႔ ဒီဇုိင္းလုပ္ေပးရပါတယ္… ေမာ္နီတာေပၚမွာ RGB နဲ႔ဒီဇုိင္းလုပ္ရင္ အေရာင္ေတြက စုိေျပေတာက္ပၿပီး ၾကည့္လုိ႔ ေကာင္းေပမယ့္ colour printer နဲ႔ထုတ္ရင္ (သုိ႔) ပုံႏွိပ္စက္နဲ႔ ႐ိုက္ႏွိပ္တဲ့အခါ အလြန္ မြဲေျခာက္တဲ့ အေရာင္၊ အလြန္မိႈင္းတဲ့ အေရာင္ေတြ ျဖစ္တတ္တဲ့အတြက္ ပုံႏွိပ္တဲ့ ေနေရာမွာ သုံးမယ့္ ဒီဇုိင္းလုပ္မယ္ဆုိရင္ေတာ့ လုပ္ကတည္းကိုက CMYK နဲ႔ လုပ္တာ အေကာင္းဆုံးပါပဲ…
Background Contents ကေတာ့ canvas စရဲ႕ အေရာင္ပါ… အျဖဴေရာင္ ၊ Background color ၊ Transparent ထဲက တစ္ခုခု ေရြးလုိ႔ရပါတယ္… Background color ဆုိတာက toolbox မွာ ေရြးထားတဲ့ background အေရာင္ကို ေျပာတာပါ… ေအာက္က ပုံမွာ ေရွ႕က အျဖဴေရာင္က foreground color ျဖစ္ၿပီး
 ေနာက္က အနီေရာင္က background color ျဖစ္ပါတယ္… ခုဒီအေျခအေနအတုိင္းမွာ Background color ကို ေရြးလုိက္ရင္ က်ေတာ္တုိ႔ အနီေရာင္ပိတ္စနဲ႔ လုပ္ထားတဲ့ canvas ကိုရမွာ ျဖစ္ပါတယ္…
ဒါေတြ လုပ္ၿပီးရင္ေတာ့ OK button ကို click လုပ္လုိက္ပါ…
က်ေတာ္တုိ႔အတြက္ ေဘာင္ၾကပ္ထားတဲ့ canvas ရၿပီမုိ႔ ဒီဇုိင္း စလုပ္လုိ႔ရပါၿပီ…
စိတ္ပါတဲ့ အခ်ိန္က်ရင္ ဆက္လက္ခ်ီတက္ပါ့မယ္…
ခုေရးထားတာေလးက NativeMyanmar က ထုတ္ေဝတဲ့ ဇာတိႏြယ္ ဂ်ာနယ္မွာ ပါၿပီးသားပါ...
ဤေဆာင္းပါးပါ အခ်က္အလက္မ်ားကို စီးပြားေရးဆန္တဲ့ လုပ္ငန္းမ်ားမွာ ျပန္လည္ အသုံးျပဳမည္ဆုိပါက ႀကိဳတင္ ခြင့္ေတာင္းၾကပါရန္ ေမတၱာရပ္ခံအပ္ပါသည္။
My Labels: Photoshop, Tutorial,
Comments
ကြန္ပ်ဴတာ လမ္းညႊန္တို႕ လက္ဆြဲတို႕ေရးတဲ့ စာေရးဆရာေတြလို ေမာင္လွ ဆိုတဲ့ နာမည္နဲ႕ လက္ဆြဲတို႕ လမ္းညႊန္တို႕ တစ္ေန႕ထြက္လာလိမ့္မယ္လို႕ ကၽြန္ေတာ္ ယံုၾကည္ေနမိတယ္ .. :)
က်ြန္ေတာ္လဲ ခုမွပဲ RBG နဲ့ CMYK ျပသနာကို ေသေသခ်ာခ်ာသေဘာေပါက္သြားေတာ့တယ္ ဆက္ေရးပါ ကိုေမာင္လွရာ က်ြန္ေတာ္လဲ photoshop ကို သံုးသာသံုးေနတာ ကိုေမာင္လွကေတာ့ အေျခခံက်က်နဲ့ေထာင့္စိတာမို့ က်ြန္ေတာ္ စိတ္ေရာကိုပါခ်ီးမြန္းလိုက္ပါတယ္ဗ်ာ။
Microsoft have launched a new technology to compete with Abode Photoshop, Flash, dreamweaver. You should try it http://silverlight.net/community/gallerydetail.aspx?cat=1
You need to download silverlight plugin first. I think Adobe is better. But for the .Net developer, they will choose WPF/E. Hopefully, you would be interested in such graphic and animation technology